The application menu contains a list of applications that the user is allowed to access based on the permissions assigned. The management of these permissions is handled by the highly-developed and sophisticated Allegro module, which allows to define the user's role within the Allegro Framework. Among other things, this is the right to create records, modify and delete them, allow data export or access the API. A description of this module is not part of this manual.
Allegro Framework offers two types of menus - tree and drop-down. Switching between them is possible in the user settings.
Tree Menu
By default, this menu is displayed on the left edge of the work area. By dragging the panel header, menu can be moved to the opposite side, and you can also specify whether to swap the menu and status bar elements. By dragging the inner edge the width of the menu panel can be changed. Any such change, as well as the current menu position, is saved to the user's profile and restored at the next login.
The menu is composed of several sections (Accountancy, Business, Subito, Assets Management, ... in the picture below), between which it is possible to move using keyboard shortcuts. The number and content of sections is determined by the purchased Allegro license and the user's assigned access rights.
The  button pushes the menu beyond the edge of the browser and thus enlarges the work area. The
  and
and  buttons in the panel header expand or collapse all menu folders in all sections.
The  button is only accessible from the user-defined menu and serves to clear it completely.
Using the integrated search field (Find ...), you can find and display only the applications according to the entered phrase in the menu. Only letters and numbers are accepted, and the search becomes progressively more precise with each character entered. The name of the application in the currently selected menu is always searched. The number of applications found is displayed in the header of each section. You can cancel the search results and display the full menu again in the search field by pressing the Esc key or using the  button.
The tree menu panel can display three different configurations - system, simplified and user-defined.
 Tree menu panel |
 Search results for the phrase "compan" |
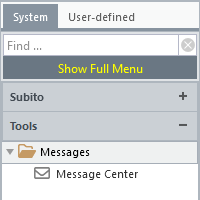
System Menu
It contains a tightly structured menu of applications that the user can access.

Simplified Menu
It appears when you click the Show Simplified Menu button and offers a tightly structured subset of the system menu. It serves as a menu of the key or user-frequented applications of each section.
User-defined Menu
It is a menu created by the user by dragging individual applications or entire folders (tree nodes) from the system menu and dropping them into the selected section of the user-defined menu. The switch occurs when the mouse is hovered over the User-defined tab. The location of a menu item or folder can be changed within a section by drag and drop.
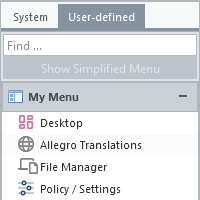
After switching to the user menu, the button  for clearing the entire menu becomes enabled.
Right-click on a section heading, menu item or folder, or on an empty space in a section to display the relevant context menu.
 Change section header |
 Remove a menu item |
 General local menu |
To rename or create a section (options Rename and Add Panel), there is a dialogue box in which, in addition to the section caption, you can also choose an icon. Here you can select from two pre-set sets - Classic and Awesome. For the latter, the icon can be selected from a list or a valid CSS class name (eg fa-regular fa-house) from the current Font Awesome library can be inserted.

Rename or add a section
Drop-down Menu
An alternative to the tree menu. This is a fixed menu located below the status bar and can be switched to it in the user settings by checking the Use drop-down menu option.

Drop-down menu