A typical list toolbar contains buttons grouped into three groups whose order and location can be changed by dragging with the mouse. This change is not saved in the user's profile and only applies to the application until it is closed.
The Use modern icons option in the user settings can be used to specify the appearance of the toolbar. This can also be adjusted using the options for the application toolbar (icon size, caption position, ...).

List toolbar - modern icons

List toolbar - classic icons
Group Record

Keyboard shortcut Ctrl+Alt+N.
Open an empty (or pre-filled with default values) form to create a new record.

Open the form filled with the data of the selected record. Values can be changed as required and then saved as a new record. This option is only available when only one record is selected.

Keyboard shortcut Ctrl+Delete.
Permanently remove the selected record from the database. The action needs to be confirmed. The number of selected records is displayed in the button caption (if showing button text is enabled). Multiple records can be selected using the Ctrl and Shift keys.
Group Tools

Click on the button to open the following menu:
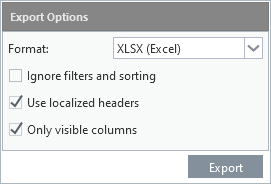
All lists have a built-in option to export rows with respect to filters and current sorting. By checking the Ignore filters and sorting option, it is possible to export all records and not just the currently displayed ones. The export can be in xlsx and csv format.
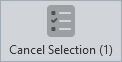
Deselect all selected rows in the list. Their number is displayed in the button caption (if showing button text is enabled).

Keyboard shortcut Alt+F5.
Reload the list from the server, respecting the current filter and sort settings.


The button interacts with the list configuration, i.e. with its sorting, columns setting and specified filters. The appearance of the button changes with the filters and settings applied (see below).
If state monitoring is enabled and the default columns filtering is changed, or the sorting, order, and width of columns or their visibility is changed, the new status is saved. This is indicated by a bold button caption (if showing button text is enabled). If these changes are rolled back, the reverse steps are taken and the list is therefore returned to its original default state, the saved state is automatically discarded and the button regains a simple label.
Clicking on the arrow (or pressing the down arrow key if the button has focus) opens a menu with the following items:
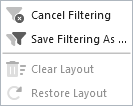
•Cancel Filtering
Item is enabled only when the list is filtered and is used to remove all set filters and load the list in its original unfiltered configuration. Any changes to the sorting, order and width of the columns or their visibility are preserved.
If filtering is cancelled on a list to which a saved configuration is applied (see Save filtering as option below), this is evaluated as a list state change. If it differs from the default configuration, this change is saved to the database and applied when the list is reopened if no saved configuration is marked as default. For example, this situation may occur in a following scenario:
1.Saved configuration with filter on one column is applied.
2.The user changes the order of the columns, this change is automatically saved in the currently loaded configuration.
3.The filtering is cancelled, but the changed column order is retained and all is saved as a change of list state.
4.If the applied saved configuration was and is marked as default, when the list is reopened, it is loaded including the change of columns.
5.If the saved setting has not been marked as default or this flag has been removed, when the list is reopened, only the change of column settings (change of state) is applied, indicated by a bold button caption.
If the list is filtered, this setting can be saved under the selected name for future use. A number of different filter configurations can be created (including sorting and column widths and their visibility) and then applied to the list automatically when it is opened (with the Default option checked), or by selecting from the menu of saved configurations that opens when you click the Filters button.
If a saved filter is applied, either automatically or by selecting from the menu, this is indicated by a change in the colour of the button icon. The configuration marked as default takes precedence over the application of any list state change.
If the currently loaded filter configuration is changed, for example, a filter is added or removed, the sorting of columns, their order, width or visibility is changed, this change is automatically saved to the currently used configuration and applied after reloading.

Save configuration under the selected code

A list of saved configurations with one default configuration checked
The item is enabled only if a change of the list state has been applied (indicated by a bold button caption). With this command, the saved settings a re deleted from the state database and is no longer applied when the list is reopened.
•Restore Layout
The item is enabled only if the saved layout and filter settings are applied or the list state has changed. The command causes reconfiguring the list to the default layout and settings. However, the initially applied configuration is not deleted and is reapplied when the list is reopened.
Group Assistance

If a manual is found for the application, the Help button is included in the toolbar. Help is the same for both the list and the record detail (form) and is displayed in a separate browser window when clicked.